Tutorial
Simulating a 6‑DoF Robotic Arm in ROS 2 + Gazebo
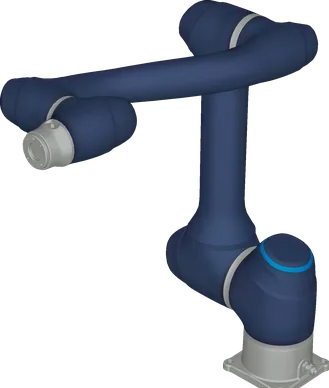
Build, spawn and control a Doosan a0912 six‑axis arm in simulation — from the URDF/xacro description to a working trajectory controller — on ROS 2 Jazzy and Gazebo Harmonic (Ubuntu 24.04).
Este tutorial está disponible únicamente en inglés.
Updated June 2026. This tutorial was rewritten for ROS 2 Jazzy + Gazebo Harmonic (gz‑sim). The original targeted ROS 2 Foxy + Gazebo Classic, both now end‑of‑life. The biggest practical change: you no longer build
ros2_controlandgazebo_ros2_controlfrom source — everything installs fromapt. A summary of all the changes is at the end of the page.
What you’ll build
By the end you will be able to:
- Install the ROS 2 control and Gazebo packages.
- Spawn the 6‑DoF arm in Gazebo Harmonic.
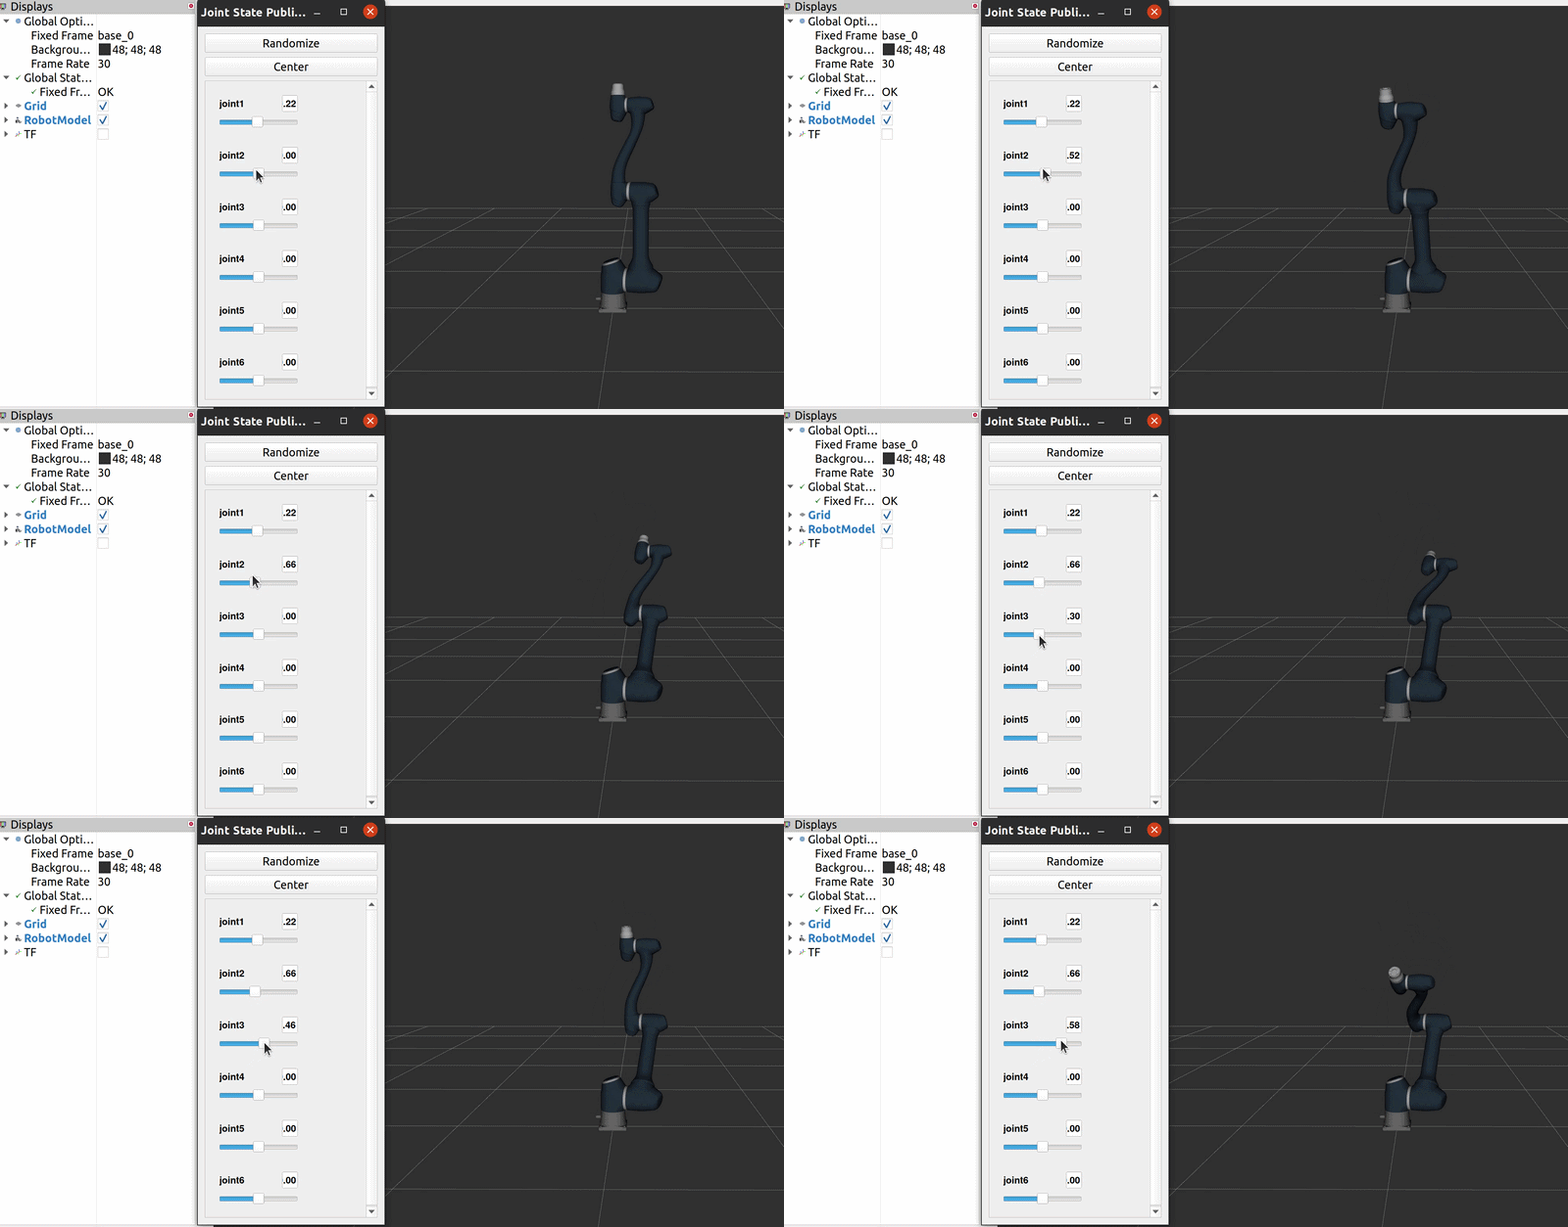
- Visualize the robot in RViz 2 and move each joint with sliders.
- Drive the arm with a
joint_trajectory_controllerand send your own trajectory goals.
Prerequisites
You only need the platform installed first:
| Requirement | Version (tested) |
|---|---|
| Ubuntu | 24.04 |
| ROS 2 | Jazzy — install guide |
1. Install the dependencies
A single apt command installs everything: Gazebo Harmonic (pulled in by ros‑gz), the ros_gz bridge/sim, ros2_control, gz_ros2_control, the controllers, and the visualization tools. It is safe to run on any ROS 2 Jazzy install — packages you already have are simply skipped.
sudo apt install ros-jazzy-ros-gz ros-jazzy-gz-ros2-control \
  ros-jazzy-ros2-control ros-jazzy-ros2-controllers \
  ros-jazzy-joint-state-publisher-gui ros-jazzy-xacro \
  ros-jazzy-robot-state-publisher ros-jazzy-rviz2 ros-jazzy-tf2-ros
2. Get the code
Create a colcon workspace and clone the repository into its src folder:
mkdir -p ~/ros2_ws/src
cd ~/ros2_ws/src
git clone https://github.com/dvalenciar/robotic_arm_environment.git
cd ~/ros2_ws
colcon build
source install/setup.bash
Remember to source install/setup.bash in every new terminal (after first sourcing /opt/ros/jazzy/setup.bash).
3. Spawn and move the arm
This launch file starts Gazebo, spawns the arm, and brings up the controllers — all in one command:
ros2 launch my_doosan_pkg my_doosan_gazebo_controller.launch.pyGazebo opens with the arm standing on the ground plane. In a second terminal, confirm the controllers are active:
ros2 control list_controllersjoint_trajectory_controller joint_trajectory_controller/JointTrajectoryController active
joint_state_broadcaster joint_state_broadcaster/JointStateBroadcaster activeNow command a pose by publishing a trajectory goal (six joint angles, in radians):
ros2 topic pub --once /joint_trajectory_controller/joint_trajectory \
  trajectory_msgs/msg/JointTrajectory \
  '{joint_names: [joint1, joint2, joint3, joint4, joint5, joint6],
    points: [{positions: [1.0, -0.5, 0.8, 0.0, 0.7, 0.0], time_from_start: {sec: 2}}]}'
The arm interpolates smoothly to that configuration over two seconds. 🎉
4. Visualize in RViz 2
To inspect the robot model and drive each joint by hand, launch the RViz view (no physics — pure visualization):
ros2 launch my_doosan_pkg my_doosan_rviz.launch.pyA joint_state_publisher_gui window opens with one slider per joint; drag them to move the arm in RViz. If the model does not appear, set Fixed Frame to world in the top‑left of RViz.
How it works
The my_doosan_pkg package is organized like this:
my_doosan_pkg/
├── description/
│   ├── xacro/      # robot description + control plugin (xacro → URDF)
│   └── meshes/     # COLLADA (.dae) visual meshes from Doosan
├── config/         # controller configuration (simple_controller.yaml)
├── launch/         # launch files
└── worlds/         # gz-sim SDF world
The arm geometry comes from Doosan Robotics’ official a0912 model (COLLADA meshes and joint definitions). The interesting part for simulation is how the robot is wired to ros2_control through Gazebo.
The control plugin (xacro)
Two things are declared in the description. First, a <ros2_control> block tells the framework which joints exist and which interfaces they expose:
<ros2_control name="GazeboSimSystem" type="system">
  <hardware>
    <plugin>gz_ros2_control/GazeboSimSystem</plugin>
  </hardware>
  <joint name="joint1">
    <command_interface name="position">
      <param name="min">-6.2832</param>
      <param name="max">6.2832</param>
    </command_interface>
    <state_interface name="position"/>
    <state_interface name="velocity"/>
    <state_interface name="effort"/>
  </joint>
  <!-- joint2 … joint6 follow the same pattern -->
</ros2_control>
Second, the Gazebo plugin that hosts the controller manager inside the simulation and reads the controller configuration:
<gazebo>
  <plugin filename="gz_ros2_control-system"
          name="gz_ros2_control::GazeboSimROS2ControlPlugin">
    <parameters>$(find my_doosan_pkg)/config/simple_controller.yaml</parameters>
  </plugin>
</gazebo>
Hard-won tip — damping & friction. The original Doosan description does not include
dampingandfrictionon the joints. Add them yourself (per joint, in the xacro). Without them the arm looks unstable in simulation and the joints make strange, jerky movements that the controller then fights. Tune the values for your robot — too little and it wobbles, too much and it feels sluggish.
The controller configuration
config/simple_controller.yaml declares the two controllers and the joints the trajectory controller drives:
controller_manager:
  ros__parameters:
    update_rate: 100  # Hz
    joint_state_broadcaster:
      type: joint_state_broadcaster/JointStateBroadcaster
    joint_trajectory_controller:
      type: joint_trajectory_controller/JointTrajectoryController

joint_trajectory_controller:
  ros__parameters:
    joints: [joint1, joint2, joint3, joint4, joint5, joint6]
    command_interfaces: [position]
    state_interfaces:    [position, velocity]
ROS 1 → ROS 2 gotcha. Notice the controller YAML is not loaded in the launch file. In ROS 2 it is referenced from the robot description — the
<parameters>tag inside the Gazebo control plugin above points atsimple_controller.yaml. (In ROS 1 you loaded it from the launch file instead.)
The two controllers
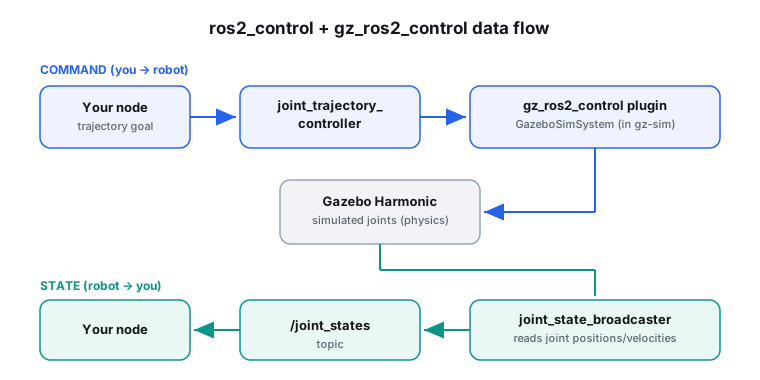
These are the heart of the simulation — one writes, one reads:
joint_trajectory_controller(write): you send it a target configuration and a time; it interpolates a smooth path and commands the joints at every control tick.joint_state_broadcaster(read): publishes the current joint positions and velocities on/joint_states— what RViz, TF, and your own code consume.
The launch file
my_doosan_gazebo_controller.launch.py wires it together:
- Publish the robot description from the xacro through
robot_state_publisher. - Start Gazebo with the empty world via
ros_gz_sim. - Spawn the robot from the
/robot_descriptiontopic withros_gz_sim create. - Bridge the simulation clock (
/clock) so ROS nodes use sim time. - Load the controllers with the
controller_managerspawner, in order.
Gotcha. The robot description must be wrapped so launch treats it as a string, otherwise it tries to parse the whole URDF as YAML and the launch crashes:
ParameterValue(Command(['xacro', ' ', xacro_file]), value_type=str)
The launch files
The package ships four launch files, each for a different need:
| Launch file | What it does |
|---|---|
my_doosan_gazebo_controller.launch.py | Gazebo + arm + controllers — the full demo used above. Spawn it and drive it with the trajectory controller. |
my_doosan_rviz.launch.py | RViz only (no physics) with the joint‑slider GUI — for inspecting the model and moving joints by hand. |
my_doosan_gazebo.launch.py | Gazebo + arm only, no controllers — just spawns the robot to check it loads. |
my_doosan_controller.launch.py | Arm + controllers but no Gazebo — a building block meant to be included by another launch (e.g. the RL environment) that starts Gazebo itself. |
What changed from the old (Foxy + Gazebo Classic) tutorial
If you followed the original version, here is everything that moved:
| Old (Foxy / Classic) | New (Jazzy / Harmonic) | |
|---|---|---|
| Ubuntu | 20.04 | 24.04 |
| ROS 2 | Foxy | Jazzy |
| Simulator | Gazebo Classic | Gazebo Harmonic (gz‑sim) |
| Control plugin | gazebo_ros2_control (built from source) | gz_ros2_control (from apt) |
| Hardware interface | gazebo_ros2_control/GazeboSystem | gz_ros2_control/GazeboSimSystem |
| Launch / spawn | gazebo_ros, spawn_entity.py | ros_gz_sim (gz_sim.launch.py, create) |
| World file | Classic SDF + libgazebo_ros_* plugins | gz‑sim SDF + gz‑sim‑*‑system plugins |
| Controller YAML | included deprecated write_op_modes / interface_name | cleaned up (those keys removed) |
The old tutorial also required building ros2_control and gazebo_ros2_control from specific source branches. On Jazzy that whole step is gone — the single apt command above covers it.
Next steps
This arm is the foundation for a full reinforcement‑learning reacher task — adding a target sphere and a Gymnasium‑style environment. See the companion project:
- robotic_arm_environment — full source (arm, target sphere, RL environment).
- Back to all projects.